OpenID Connect login

What is OAuth 2.0?
OAuth2 (OAuth 2.0) is an open standard for access delegation, commonly used as a way for Internet users to grant websites or applications access to their information on other websites but without giving them the passwords.
OAuth2 is an authorization mechanism that enables you to:
- Call NBG APIs
- Access the end user’s data, given the user’s consent
How to use OAuth2?
The OAuth2 protocol enables secure communication with permission which is encoded in an access token. This access token is obtained through the OAuth2 operations client credentials and authorization code.
When you call an NBG API, you provide the access token to the Authorization HTTP header in the request message, as seen in the example below:
|
Authorization: Bearer a4873bd37bfe9b6407a102c820fffbad867cbc1f2ab2d2c0abbedcc74dfd614d |
If the token is accepted, your request proceeds to the specific API and will either succeed or fail for other reasons. However, if the token is not accepted, you’ll get a response with a 401 HTTP status from the NBG gateway.
To generate an access token you will proceed with one of the following operations:
- Client Credentials workflow if the API does not access the end user’s data.
- Authorization Code workflow if the API does access the end user’s data.
Important Notice: To generate an access token, you must first create and subscribe an app, under your organization of choice, by clicking the APPS tab on the NBG Developer Portal. In the app creation process, you will choose which of the two OAuth2 workflows suits your application, depending on the API you want to access.
Create and Subscribe an APP
Below are the steps required to create an application on the NBG Developer portal and subscribe it to an API.
- Login/Register to the NBG Technology HUB
- Go to "APPS"
- Select your Organization and go to step 4. If you want to create a new Organization click "CREATE AN ORGANIZATION" and follow the steps below:
- Enter the title of your Organization
- Enter a short description of your Organization (optional)
- Click "SUBMIT"
- Select the Organization of choice and click "ADD AN APPLICATION"
- Fill in the forms (title and short description)
- Check "Authorization Code" and/or "Client Credentials" as described in the API documentation
- Enter the OAuth2 Redirect and Post Logout URIs (these are the URIs that we will redirect the user upon logging in and logging out respectively) You can use the following redirect URL to easily test the API and obtain access tokens through the portal: https://developer.nbg.gr/oauth2/redoc-callback
- Click "SUBMIT"
- Store the APPs "Client ID" and "Client Secret"
Now your app should look like this:

- Go to "API PRODUCTS" and select the API of your choice
- Scroll down until you find "START USING THIS API" and click on it

Choose the app you want to subscribe to and click on the “unsubscribed” button.

After the successful subscription your app should look like this:

You are now ready to Get an Access Token. The sections below describe this process in detail, and provide two methods to follow what suits you best.
The API scopes needed as part of this process, are provided in the Authentication and Authorization (OAuth2) section on the Technical Documentation pages of the specific API. For example:

Client Credentials flow
The client credentials flow generates an OAuth2 token that gives your app permission to call NBG APIs that do not provide access to the end user’s data. To generate the token with client credentials you should first create an app and subscribe your app to the NBG API you intend to use (see section Create and Subscribe an APP).
Aside from your client keys and the scopes of the API that you intend to use, you should also know the /token endpoint that you should use to get the access token. Here is the NBG /token endpoint:
Please, follow the instructions below to get an access token using either the Postman tool or the Get Token API on the NBG Developer Portal.
Get the token using Postman
To get an access token using the Postman tool you need to import the API’s postman collection. For every NBG API you can find the corresponding postman collection in the API’s Technical Documentation pages at the section Feedback and Questions as shown in the image below:

When you download the postman collection and environment files, you follow the steps below to import them:
Import Collections
Click “Import”

Select the desired postman collection, for example bill payments, and click “Import”.

Now you should see the new collection like this:

Then click on the “settings” symbol and then “Import” to add the new environment.


Select the desired environment and click “Import”. You should now see the environment like this:

Edit the environment
Click the “eye” symbol and then “Edit” to edit the parameters

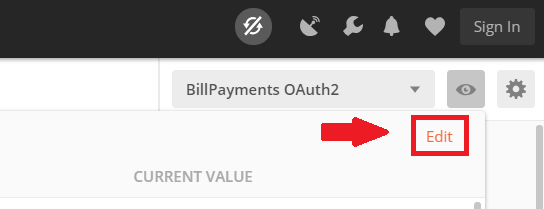
Fill in the required parameters Client-id, Client-secret, redirect_uri, scope and click “Update”. If you don’t know where to find these parameters read the section “Create and Subscribe an APP” above.

Get your token!
Now you are ready to get your token. To get a new access token using the client credentials flow follow the steps below:
Go to your collection folder and click the three dots:
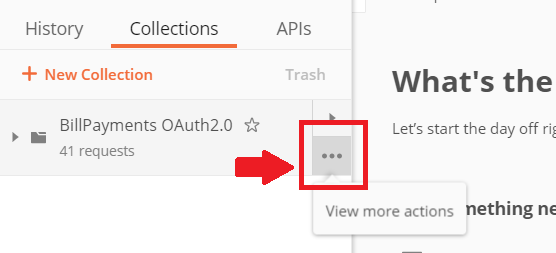
Then click “Edit”.

Go to the “Authorization” tab, set “Type” to “OAuth 2.0” and click “Get New Access Token”.

Now set a name for your new token, set the Grant Type to Client Credentials and parse the parameters from the environment as shown below:

Then click “Request Token” and you should see your new token.

Click “Use Token” to use your new access token for the endpoints contained in the postman collection folder.
Get the token using the NBG Developer Portal
Call the /token endpoint
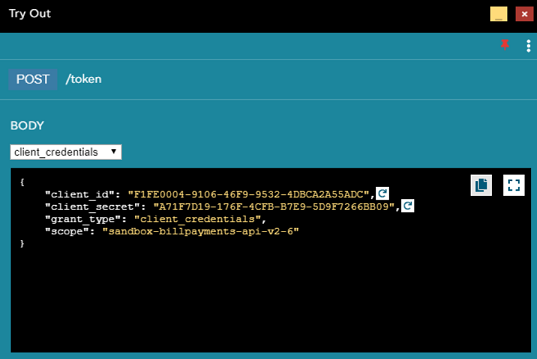
Go to the Get Token API, which can be found on the technical documentation of each OAuth2 protected API product, and ask for a token using the /token endpoint and method client credentials. Then fill the fields client_id and client_secret with your Client Id and Client Secret, use as grant_type client_credentials and finally pass the API scopes to the field scope (multiple scopes are separated with a space).
For example below we are using the bill payments API. The body of your API call to get the token will look like this:
Get your token!
If your request was OK, then the response contains your access token and its expiration time.

Authorization Code flow
The authorization code flow generates an access token that gives your app permission to call the NBG APIs that provide access to the end user’s data. To generate the access token with the authorization code flow, you should first create an app and subscribe your app to the NBG API you intend to use (see section Create and Subscribe an APP).
Aside from your client keys and the scopes of the API that you intend to use, you should also know the /authorize and the /token endpoints that you should use to get the access token. Here is the NBG /authorize and /token endpoints:
Please, follow the instructions below to get an access token using either the Postman tool or the Get Token API on the NBG Developer Portal.
Get the token using Postman
To get an access token using the Postman tool you need to import the API’s postman collection. For every NBG API you can find the corresponding postman collection in the API’s Technical Documentation pages at the section Feedback and Questions:

When you download the postman collection environment files, follow the steps below to import them:
Import Collections
Read the section for the Client Credentials flow.
Edit the environment
Read the section for the Client Credentials flow.
Get your token!
Now you are ready to get your token. To get a new access token using the authorization code flow follow the steps below:
Go to your collection folder and click the three dots:

Then click “Edit”.

Go to the “Authorization” tab, set “Type” to “OAuth 2.0” and click “Get New Access Token”

Now set a name for your new token, set Grant Type to Authorization Code and parse the parameters from the environment as shown below:

Then click “Request Token” and you should see your new token.

Click “Use Token” to use your new access token in every endpoint included in the postman collection folder.
Get the token using the NBG Developer Portal
Get authorization code
Use the /authorize endpoint of the Get Token API to get the code Copy and paste your Client ID, set response_type to code, set the desired scope, and the redirect_uri. If you don’t know which redirect URI to use just paste https://developer.nbg.gr/oauth2/redoc-callback, but remember that you should also set this URI in the redirect URI field of your app.

At this point, you should give the necessary consent for your app to gain access to the data of the API.

After you give your consent the API should return the authorization code.

Exchange the code for an access token
Now you can get the access token by parsing your Client ID, Client Secret, and the authorization code to the field code. Use as grant_type authorization_code and redirect_uri the same as in the /authorize step.
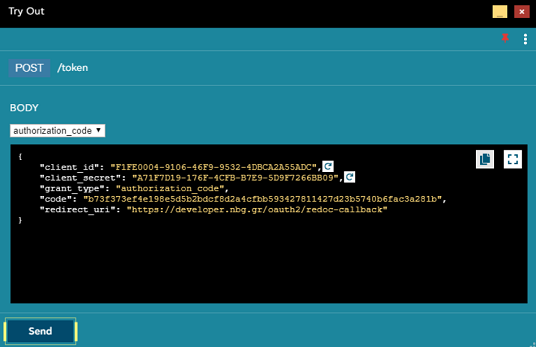
Get your token!
After the successful call the API returns the access token with the expiration time.

Refresh token
To refresh your access token you follow almost the same procedure as with the authorization code flow but with an extra scope to get the refresh token.
First Create/Use an App (same as before)
Get authorization code with scope “offline_access”
Do the same as step 1 in the authorization code flow, just add the scope “offline_access” after your desired scopes.

Continue with the rest of the authorization code flow steps as described before.
Get the access and refresh token
Now you get your access token together with a refresh token. You will use this refresh token to refresh your access token.

Refresh your access token
When your access token expires, use the /token endpoint with your Client ID, Client Secret, grant_type refresh_token, and use the refresh token of the previous step.

Get your new access and refresh tokens!
After the successful call you get a new access token and a new refresh token for future use.

User Consent
Some of our APIs implement customized user consent flows, allowing our users to provide their explicit consent on certain types of data access; e.g. the PSD2 API products. This section will guide you on the steps needed to redirect your user to the Consent UI of the API.
Create Consent (postman)
For the purpose of this document we are using the Account Information - UK Open Banking API. Please import the postman collection and environment of the API of your choice as described in this section.
To create a consent you must first get an access token using client credentials as the authorization method. To do this use the steps described in this section. In the end you should see the token like this:

Click “Use token” and then “Update” to continue. Now you are ready to create a new consent for your application.
Using the Create Consent method, under the collection of the imported API, you can create a new consent.

Here is what a successful consent creation looks like:

Notice the ConsentId parameter which will be used now for the authorization step.
Authorize Consent
To allow your user to authorize a consent, you need to redirect her to the Consent UI of the API. This redirection will take place when you follow the Authorization Endpoint by amending the generated "Consent ID", like this:
|
https://my.nbg.gr/identity/connect/authorize?consent_id={{consent-id}} |
Actually you are going to get a new access token like before but now using Authorisation Code flow with the mentioned amendment of the extra URL parameter as shown above.
To do this go to the get token screen, choose authorisation code as method, and perform the needed amendment:

Once your user is redirected to the Consent Authorization Screen, they need to enter their IBank Credentials and either Authorize or Reject the Consent.

An SMS OTP will be sent to your user’s mobile phone.

Upon successful completion of the SMS challenge, the Consent is now authorized and you can proceed with consuming the user’s data.
Create Consent (developer portal)
Instead of using postman or any other software of your choice, you can create and authorise a consent using the developer portal.
To create a consent you must first get an access token using client credentials as the authorization method. To do this use the steps described in this section. In the end you should see the token like this:

After the successful token creation using client_credentials as the authorization flow, go to the API of your choice, that requires consent, and to the following. For the purpose of this example we are using the Account Information UK.
Call the account/access/consents
Go to the account/access/consents and hit “try-out”. Fill the required information as indicated in the swagger of your API and use the token you got in the previous step in the authorisation field. Finally fill the body of the call as described in the swagger of your API. Our example will finally look like this:

After the successful call you should have a new consent, indicated by the Consent-id. For example:

Authorise the Consent
Now use this ConsentId to authorise your consent. Go back to the get token API and use the /authorise endpoint. Fill the required information as explained in the previous section and also include the ConsentId to the relevant field. The result should look like this:

Once you click “send”, your user is redirected to the Consent Authorization Screen, they need to enter their IBank Credentials and either Authorize or Reject the Consent.
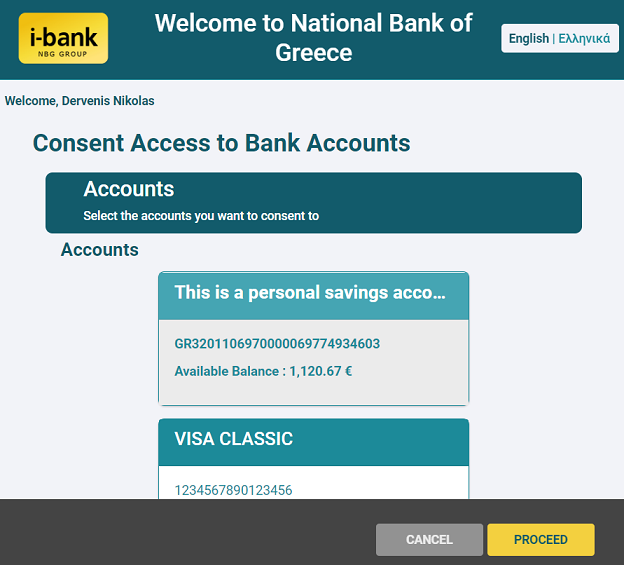
An SMS OTP will be sent to your user’s mobile phone.
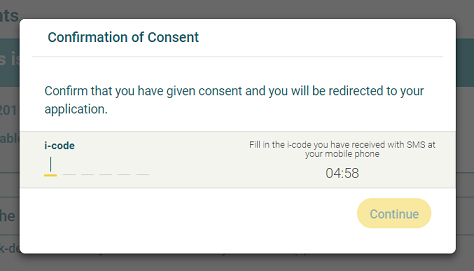
Upon successful completion of the SMS challenge, the Consent is now authorized and you can proceed with consuming the user’s data.